Conditions allow you to build complex survey logic. Conditions are defined within the survey builder and can then be used to skip questions, pre-emptively terminate the survey, screen out participants and more.
Think of conditions as placing your participants into groups. In Phonic, you can set a condition from the outset of your survey, or you can place participants into different conditions based on their response to a critical question. You can use conditions to display different questions to each group, to create survey blocks and branching, skip questions, end the survey early or screen out participants.
How Do I Set a Condition?
Survey conditions can be set from the beginning of a survey by adding the appropriate query parameter to the URL. All Phonic surveys are assigned a unique URL link, like the one below.
https://app.phonic.ai/surveys/5f62e72601792c3849faa1f3
Conditions are added to the end of the URL as a query parameter.
?EXERCISE=LOW
In this example above, "EXERCISE" is the name of the condition and "LOW" is the assigned value. Let's say you want to group participants into 2 groups: participants that you know are infrequent (LOW) exercisers and participants that you know are frequent (HIGH) exercisers. In the example above, you can use the single condition "EXERCISE" and then assign 2 different values, "LOW" or "HIGH". The two URL links for your condition will be as shown below.
https://app.phonic.ai/surveys/5f62e72601792c3849faa1f3?EXERCISE=LOW
https://app.phonic.ai/surveys/5f62e72601792c3849faa1f3?EXERCISE=HIGH
You can now display different questions to your low exercisers and high exercisers by referencing the condition in survey logic (see below).
But what if you don't know which group your participant belongs to before they start the survey? You can create conditions based on participant's response to a critical question.
How Do I Create Conditions Based on Responses?
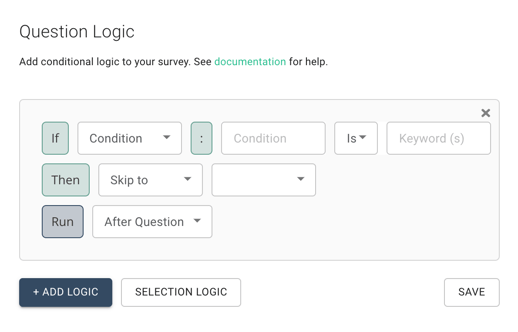
Conditions are created through survey logic. Once in survey logic, click the “+ LOGIC” button. The survey logic window should now look like the window below. To create a condition, use the “IF” and “THEN” statements.
The IF statement
Just as it sounds, the IF statement controls whether the THEN clause will run. If the user would like to assign a survey condition based on a response containing or matching a string of letters, that can be done here.
The THEN statement
The THEN statement is where you can assign conditions. Here, users can specify condition names and values they'd like to assign.
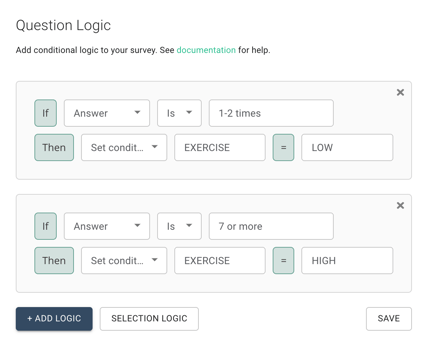
For example, IF a participant responds with “1-2 times” THEN they will be sorted into the group EXERCISE=LOW. Additionally, IF a participant responds with “7 or more” THEN they will be sorted into the group EXERCISE=HIGH.

When using the "Is" function the answer must be an exact match. This works well for multiple choice responses, but if you're working with another response type (e.g., checkbox or open-text) then use the function "Contains" in the dropdown.
Now that these two conditions are set, they can be used to screen out participants, to end the survey early for one of the groups, or to show these two groups of participants different questions.
Conditions must be set on a question before using them in survey logic. For example, if conditions are programmed on Q4 of your survey, then you can use these conditions in survey logic for any questions following Q4.
How Do I Use Conditions to Screen Out, End Survey and Skip Questions?
To use conditions to screen out, end survey, or skip questions, click the survey logic button on the question you want to apply the logic to. Using the dropdowns, change the IF statement to “IF” “Condition” and the THEN statement to “THEN” “Skip to”.

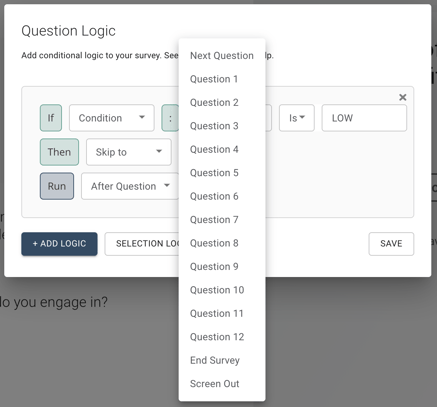
In the IF statement, enter the condition name and the condition keyword (this is the assigned value). In the THEN statement, a second dropdown should now appear. This drop down will have all of the questions in your survey, End Survey, and Screen Out.

End Survey and Screen Out can be set to different landing pages in survey settings. This is helpful if you are only paying participants who reach the end-of-survey page and not the screened-out page.
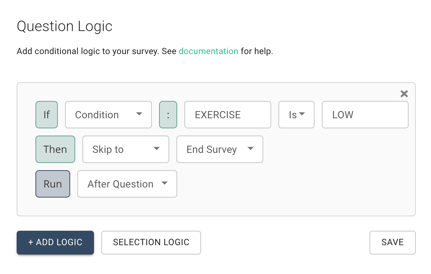
In the example below, participants in the EXERCISE=LOW condition skip to the end of the survey.

To check that your survey logic is running correctly for each condition, you can load the URL with each query parameter (see above).
How Do I Display Different Question Sets to Separate Conditions?
Once you have your conditions created, you can use them to conditionally display questions. Let’s say you have two conditions and you want them to “branch off” (i.e., you have two completely different sets of questions for each). This can be done by using the “THEN” “Skip to” function in survey logic. Below are some important steps to using survey logic to achieve this.
- Program your survey in “Blocks”. After your critical question (i.e., the question where participants are sorted into conditions) program your survey with one set of questions first, then your second set of questions. For example, Q5-Q15 will be the questions you want to display to Condition A, while Q16-Q26 are the questions you want to display to Condition B.
- Set the End Survey logic for Condition A. Participants in Condition A will continue the survey as-usual, with questions 5-15 displaying. However, to avoid Condition A from completing Q16-Q26, add End Survey survey logic on Q15. See above for how to do this.
- Set Skip logic for Condition B. To ensure that participants in Condition B do not complete the questions for Condition A, we will use skip logic. On Q4, add another logic. Set this logic to skip to Q16 after Q4 is complete. Now participants in Condition B will skip to their question set and complete the survey as-usual.
If you want to randomly assign your participants to one of two conditions (rather than conditionally assign them, as described above), you can do this by using the Random Conditions feature this doc. All of the survey logic described above can be used using Random Conditions. Random Conditions are useful if you want to run an A/B test.
